Bring Your Own Key Model
Our App operates on a Bring Your Own Key basis, which means it serves as a bridge between your Shopify site and OpenAI.
In order to use our App, you need to have an OpenAI account and purchase API credits from OpenAI.
With this approach, users are required to provide their own OpenAI API key to access the app functionality. This ensures that users maintain full control over their API keys and guarantees access to the latest, most advanced language processing technology offered by OpenAI.
INFO: Purchasing our App does not provide any credit from OpenAI.
When you buy our app, you gain access to the pro features of the app, but it does not include any API credit.
You will still need to purchase credit from OpenAI separately.
You can refer to their pricing page for more details.
How to Generate an OpenAI API Key
To generate an OpenAI API key, you will first need to sign up for an account on the OpenAI platform.
Here are the steps:
- Visit the OpenAI Platform sign-up page at https://platform.openai.com/signup.
- Fill in your personal information, including your full name, email address, and password.
- Read and accept the terms of service and privacy policy.
- Click on the Create Account button.
- You will receive an email from OpenAI containing an account activation link. Click on the link to activate your account.
- After activating your account, log in to the OpenAI Platform at https://platform.openai.com/login.
- Click on the API Keys tab in the left-hand sidebar or visit https://platform.openai.com/account/api-keys directly.
- Click on the Create an API key button.
- Enter a name for your API key. This name will help you identify the key later (e.g., “My First API Key”).
- Click on the Create button.
- Your OpenAI API key will now be generated and displayed in the API Keys section. The key will be a long alphanumeric string, such as
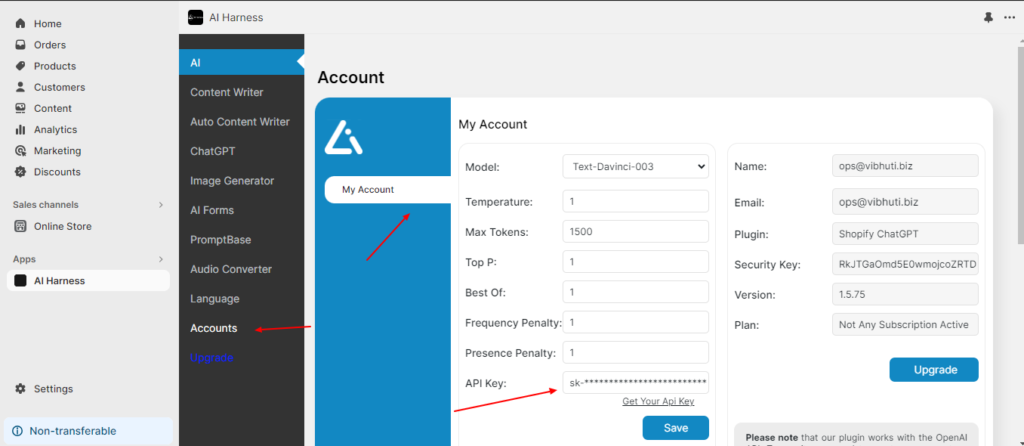
sk_1234567890abcdef1234567890abcdef. - To update it, go to the Account – API Key tab and paste your API key into the designated field in our app and hit Save button.

INFO
Please note that having a paid ChatGPT Plus subscription does not automatically grant access to the OpenAI API. You will still need to purchase API credits separately to utilize the API features.
Error Codes and Solutions
This list provides an overview of common error codes and their corresponding solutions.
Each error code is explained in detail in its own dedicated section.
Please note that, all these errors are generated by the OpenAI API and not by our app.
| Error | Cause | Solution |
|---|---|---|
| 401 – Invalid Authentication | Invalid Authentication | Ensure the correct API key and requesting organization are being used. |
| 401 – Incorrect API key provided | The requesting API key is not correct. | Ensure the API key used is correct, clear your browser cache, or generate a new one. |
| 401 – You must be a member of an organization to use the API | Your account is not part of an organization. | Contact OpenAI to get added to a new organization or ask your organization manager to invite you to an organization. |
| 429 – Rate limit reached for requests | You are sending requests too quickly. | Pace your requests. Read the Rate limit guide. |
| 429 – You exceeded your current quota, please check your plan and billing details | You have hit your maximum monthly spend (hard limit) which you can view in the account billing section. | Apply for a quota increase from OpenAI. |
| 429 – The engine is currently overloaded, please try again later | OpenAI servers are experiencing high traffic. | Please retry your requests after a brief wait or contact OpenAI. |
| 500 – The server had an error while processing your request | Issue on OpenAI servers. | Retry your request after a brief wait and contact OpenAI if the issue persists. Check the status page for updates. |
For more information, please visit the OpenAI API Reference.

